Creating the perfect listening room is the holy grail for hi-fi enthusiasts. Whether you’re dedicating an entire room to music or optimizing your living room for better sound, understanding acoustics is crucial for getting the most out of your high-end audio equipment. This comprehensive guide will walk you through everything you need to know about listening room acoustics, from basic principles to advanced treatments.
Understanding Listening Room Acoustics: The Foundation of Great Sound
A listening room is more than just a space with speakers – it’s an integral part of your audio system. Even the most expensive speakers and amplifiers can sound mediocre in a poorly treated room, while modest equipment can shine in an acoustically optimized space.
The goal of listening room acoustics is to create an environment where you hear the music as the artist and recording engineer intended, without unwanted coloration from the room itself. This involves controlling reflections, managing resonances, and achieving the right balance of absorption and diffusion.
Key Acoustic Principles for Hi-Fi Listening Rooms
Room Modes and Standing Waves
Every room has natural resonant frequencies called room modes, determined by the room’s dimensions. These create standing waves that cause certain frequencies to be emphasized or cancelled at different listening positions. The most problematic are:
Axial modes:
Between parallel walls
Tangential modes:
Involving four surfaces
Oblique modes:
Involving all six room surfaces
The Golden Ratio and Room Proportions
Ideally, avoid rooms with equal dimensions or simple ratios (like 2:1) as these create overlapping room modes. The golden ratio (1:1.618:2.618) is often cited as optimal, though any non-parallel dimensions help distribute modes more evenly.
Early Reflections vs. Late Reflections
– **Early reflections** (arriving within 15-20ms) can interfere with the direct sound, causing comb filtering and imaging issues
– **Late reflections** (after 50ms) contribute to spaciousness and ambience when properly controlled
Essential Considerations for Any Listening Room
Speaker and Listener Positioning
The 38% Rule
Position your listening chair approximately 38% into the room’s length to minimize the impact of room modes. This places you away from the worst pressure zones.
Speaker Placement
– Pull speakers away from walls to reduce boundary effects
– Angle speakers slightly toward the listening position (toe-in)
– Maintain symmetry for proper stereo imaging
– Follow manufacturer guidelines for distance from walls
The Listening Triangle
Create an equilateral triangle between your speakers and listening position, typically 8-12 feet per side for most rooms. This ensures proper stereo imaging and soundstage width.
Room Layout and Furniture Placement
Strategic Furniture Positioning
– Place the listening chair away from walls when possible
– Use bookshelves along walls for natural diffusion
– Avoid placing the listening position exactly halfway between any two parallel surfaces
– Consider asymmetrical furniture placement to break up standing waves
Simple Solutions That Make a Big Difference
Natural Acoustic Treatments
Before investing in specialized acoustic materials, try these common household solutions:
Soft Furnishings
– Heavy curtains or drapes reduce high-frequency reflections
– Thick rugs absorb floor reflections and reduce footstep noise
– Upholstered furniture provides mid-frequency absorption
– Throw pillows and blankets add variable absorption
Furniture as Acoustic Treatment
– Bookshelves create natural diffusion (avoid uniform spacing)
– Plants add irregular surfaces and some absorption
– Artwork and wall hangings break up smooth surfaces
– Different furniture heights create acoustic complexity
Managing Parallel Surfaces
Simple Techniques
– Hang tapestries or fabric wall hangings
– Install floor-to-ceiling curtains on one wall
– Use furniture to break up long parallel walls
– Consider moveable room dividers or screens
When to Invest in Dedicated Acoustic Materials
Signs You Need Professional Treatment
Consider specialized acoustic materials when:
– Simple adjustments don’t resolve obvious acoustic problems
– You notice excessive echo, flutter echo, or boomy bass
– Stereo imaging is poor despite proper speaker setup
– The room sounds very different in different listening positions
– You’re investing significantly in high-end equipment
Budget Considerations
Phase 1 (Under $500):
Basic absorption panels, bass traps for corners, strategic placement
Phase 2 ($500-2000):
Custom-sized panels, professional bass traps, diffusion panels
Phase 3 ($2000+):
Room measurement and analysis, custom solutions, comprehensive treatment
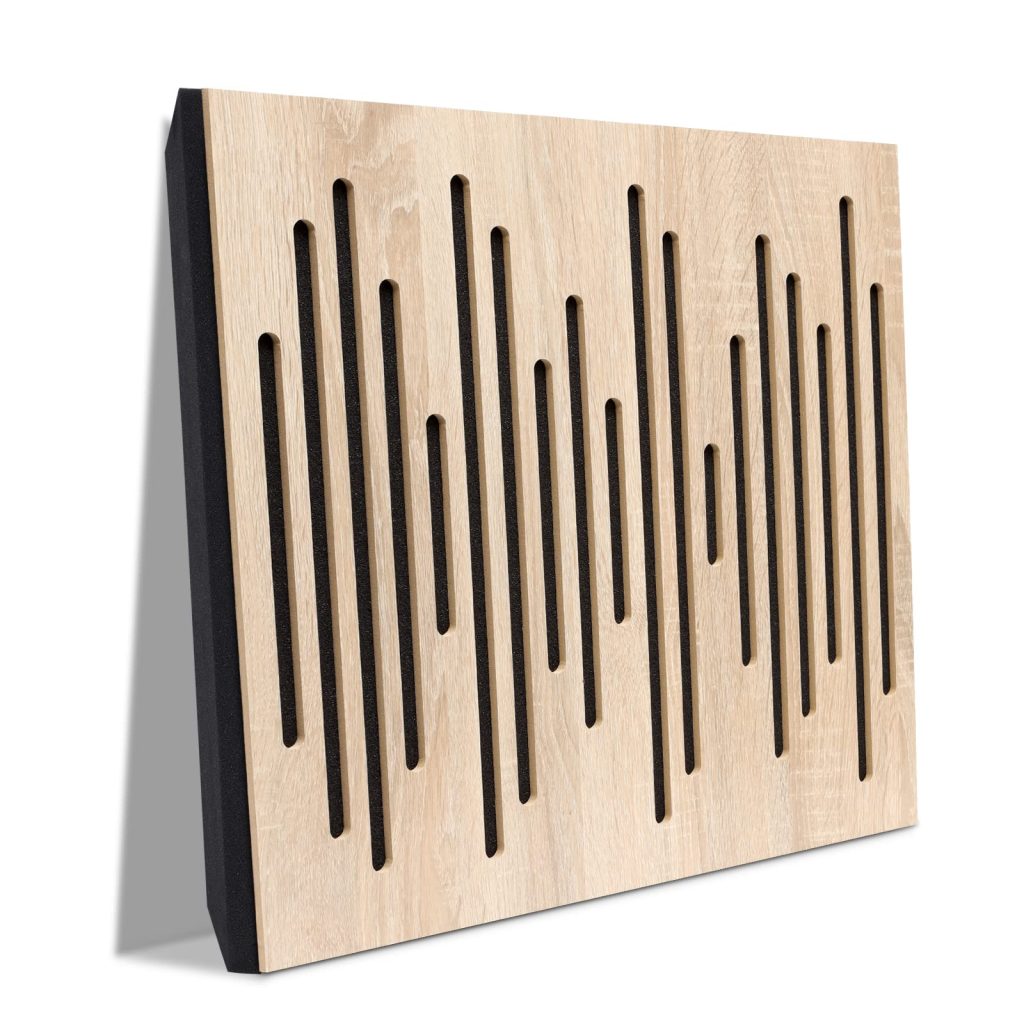
Types of Acoustic Treatment Materials
Absorption Materials
Broadband Absorbers
– Fiberglass or mineral wool panels (2-4 inches thick)
– Effective across wide frequency range
– Best for first reflection points and excessive reverberation
Bass Traps
– Thick absorbers (6+ inches) for low-frequency control
– Corner placement maximizes effectiveness
– Essential for controlling room modes
Diffusion Materials
QRD (Quadratic Residue Diffusers)
– Scatter sound energy without removing it
– Maintain liveliness while reducing echoes
– Ideal for rear walls behind listening position
Geometric Diffusers
– Various shapes and patterns
– More affordable than precision QRD panels
– Books, irregular furniture can provide natural diffusion
Designing Your Acoustic Treatment Plan
Step 1: Room Analysis
DIY Assessment
– Clap test for echo and flutter echo
– Play pink noise to identify frequency imbalances
– Test different listening positions
– Note obvious problem areas
Professional Measurement
– Room impulse response measurements
– Frequency response analysis
– Waterfall plots showing decay times
– Computer modeling for treatment placement
Step 2: Treatment Priorities
First Priority Areas
– Corner bass traps (floor-to-ceiling in all corners if possible)
– First reflection points on side walls
– Floor reflection (carpet or rug)
– Ceiling reflection point (if low ceiling)
Second Priority Areas
– Rear wall treatment (diffusion preferred)
– Additional side wall treatment
– Ceiling treatment if needed
– Fine-tuning with moveable panels
Step 3: Treatment Placement Strategy
The Mirror Method:
Sit in your listening position and have someone move a mirror along the walls. Where you see the speakers in the mirror are your first reflection points requiring treatment.
Progressive Treatment:
Start with minimal treatment and add gradually. It’s easier to add absorption than to remove excessive treatment.
Common Mistakes to Avoid
Over-Damping the Room
Too much absorption creates a “dead” room that sounds unnatural and fatiguing. Aim for controlled acoustics, not an anechoic chamber.
Ignoring Bass Issues
Low-frequency problems are often the most audible and require specific solutions. Don’t focus solely on mid and high frequencies.
Symmetry Obsession
While some symmetry is important for stereo imaging, perfect symmetry can create its own problems. Some asymmetry helps distribute acoustic issues.
Treatment Without Measurement
Guessing at acoustic problems often leads to ineffective solutions. Even basic measurement tools can guide treatment decisions.
Advanced Techniques and Considerations
Variable Acoustics
Consider treatments that can be adjusted:
– Moveable panels on tracks
– Curtains that can be opened or closed
– Rotating diffuser/absorber panels
– Furniture on wheels for repositioning
### Room-Within-a-Room Construction
For dedicated listening rooms, consider:
– Floating floors to isolate from structure-borne vibration
– Decoupled walls and ceilings
– Specialized door and window seals
– HVAC noise control
### Integration with Room Aesthetics
Modern acoustic treatments can be:
– Custom printed with artwork or photos
– Built into furniture and architectural elements
– Designed to complement room décor
– Hidden behind decorative screens or fabric
## Measuring Success: How to Evaluate Your Acoustic Treatment
### Subjective Evaluation
– Clearer vocal intelligibility
– Better stereo imaging and soundstage depth
– More even bass response across listening positions
– Reduced listener fatigue during long sessions
– Improved dynamics and detail resolution
### Objective Measurements
– Flatter frequency response at listening position
– Reduced reverberation time (RT60) in problem frequencies
– Lower background noise floor
– More consistent response across listening area
## Budget-Friendly DIY Acoustic Solutions
### Homemade Bass Traps
– Build corner traps using mineral wool and fabric
– Use PVC pipe frames for easy construction
– Rockwool or fiberglass core with decorative covers
### DIY Absorption Panels
– Picture frames with acoustic fabric and mineral wool
– Fabric-wrapped panels hung like artwork
– Acoustic foam alternatives using natural materials
### Creative Diffusion
– Varied depth bookshelves
– Cylindrical objects (logs, PVC pipes) arranged randomly
– Geometric wooden structures
– Strategic furniture arrangement
## Professional vs. DIY Approach
### When to DIY
– Limited budget but plenty of time
– Enjoyment of building projects
– Basic acoustic problems
– Rental situations requiring temporary solutions
### When to Go Professional
– Complex acoustic problems
– High-value system requiring optimization
– Lack of time or construction skills
– Integration with interior design requirements
– Permanent installation in custom-built room
## Conclusion: Creating Your Perfect Listening Environment
Optimizing your listening room acoustics is one of the most cost-effective upgrades you can make to your hi-fi system. Start with the basics – proper positioning, strategic furniture placement, and simple treatments – before moving to specialized acoustic materials.
Remember that acoustic treatment is not about creating a recording studio, but rather a space where you can enjoy music as it was meant to be heard. The goal is controlled acoustics that enhance rather than dominate the listening experience.
Whether you’re working with a dedicated listening room or optimizing a multi-purpose living space, the principles remain the same: understand your room’s acoustic behavior, address the biggest problems first, and make changes gradually while listening carefully to the results.
With patience and attention to detail, even modest rooms can be transformed into exceptional listening environments that allow your hi-fi system to perform at its best. The investment in acoustic treatment often yields more noticeable improvements than expensive equipment upgrades, making it one of the smartest moves any serious listener can make.
Remember: every room is unique, and what works in one space may not work in another. Trust your ears, measure when possible, and don’t be afraid to experiment with different approaches to find what works best for your specific situation and musical preferences.
acoustic panels, listening room, the listening room, sound dampening panels, acoustic